
Overflow Indicator in Flutter: Mastering UI Responsiveness
In modern user interfaces, it’s common to display a collection of widgets horizontally in a row or vertically in a column. However, when there is limited screen space, it can be a challenge to fit all the widgets on the screen without making the layout look cluttered. To address this, you can display widgets in a line with an overflow indicator using flutter, allowing users to access hidden content easily. Displaying widgets in a line with an overflow indicator is a user-friendly way to handle limited screen space and provide a seamless user experience.
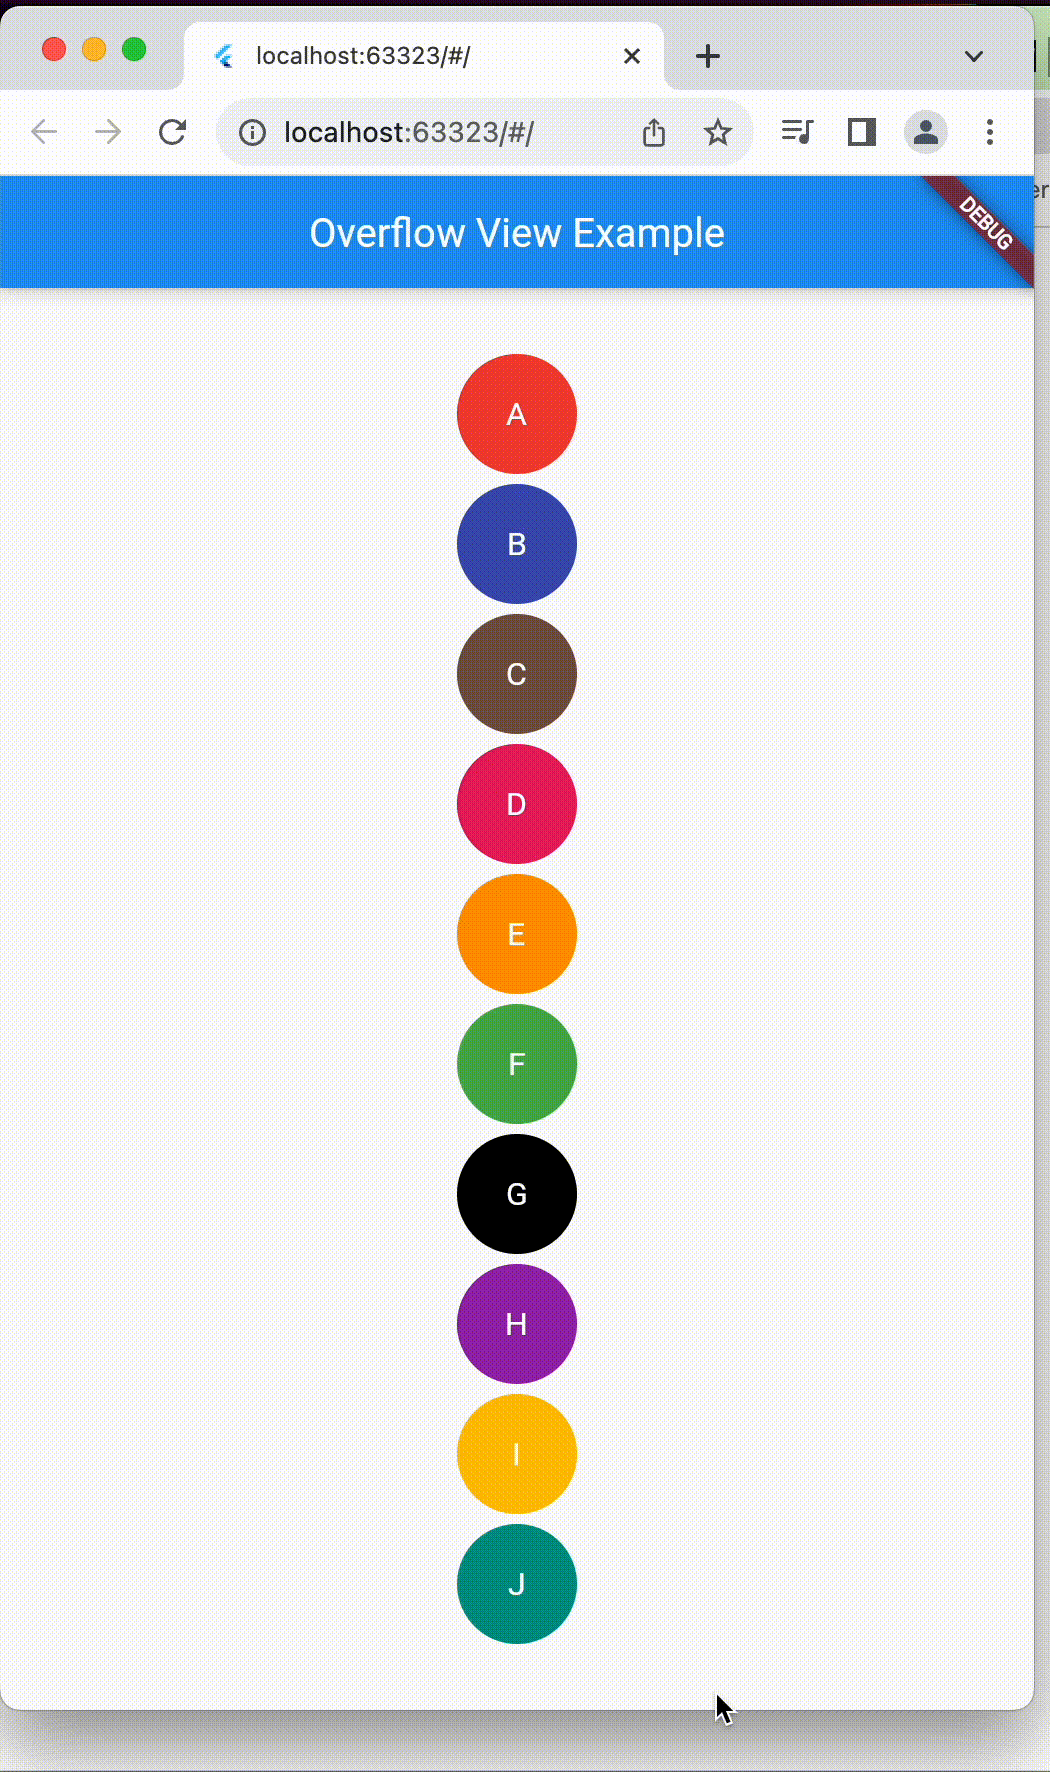
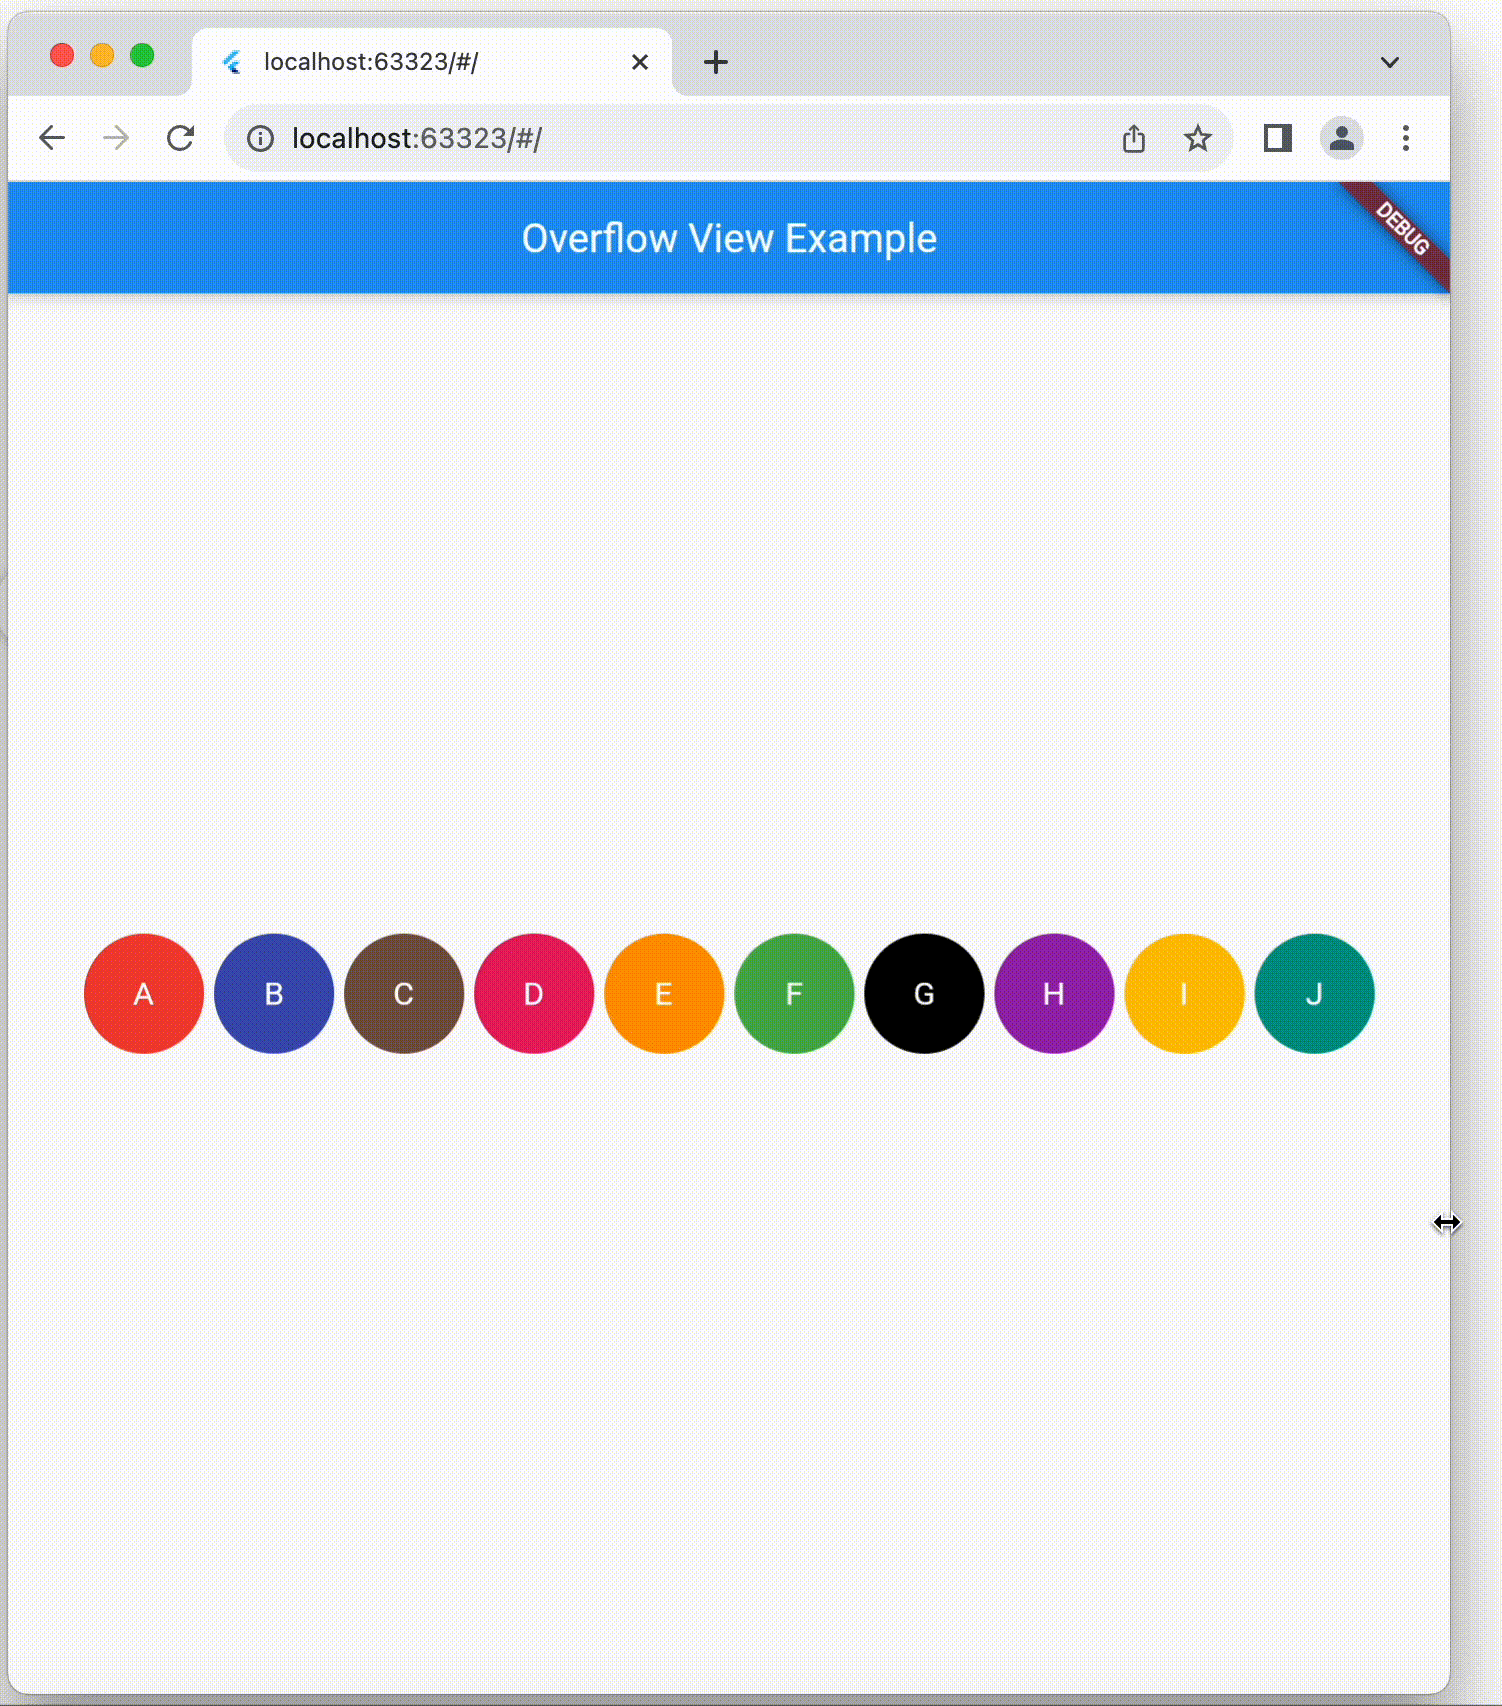
(These images are from web application)
Use Cases
The typical use cases of this kind of functionality,
- Project contributor/subscriber list
- Follower list
- Show menu options/tabs based on screen size.
In Flutter, achieving this can be a breeze with the help of the “overflow_view” package. In this blog post, we’ll explore how to display widgets in a line with an overflow indicator in flutter using this package.
Introduction to overflow_view package
The “overflow_view” package is easy & it simplifies the process of handling widget overflow. It displays children in a line with an overflow indicator at the end if there is not enough space.
This package supports below platforms,
- Android
- IOS
- Linux
- MacOS
- Windows
- Web application
Features of overflow_view package
- Renders children horizontally or vertically.
- Has an overflow indicator builder so that you can display a widget showing the number of elements not rendered.
- Can either constrain the children to the size of the first child or let them have the size they want.
- Children can overlap each other by setting a negative spacing.
Configuration
Add overflow_view package dependency in your pubspec.yaml file and run flutter pub get command to download & install the package:
dependencies:
  flutter:
    sdk: flutter
  overflow_view: ^latest_version
Replace latest_version with the actual version of the overflow_view package.
So far we have seen about “overflow_view” package & the configuration required in the flutter project. Now lets look at the changes required in the dart file.
Import Package
Import the package in your Dart file where you want to use it:
import 'package:overflow_view/overflow_view.dart';
OverflowView Widget
In order to show the overflow indicator in flutter, we are going to use OverflowView widget. This widget accepts a list of widgets we need to show along with the overflow indicator.
By using below example, lets understand how to add overflow indicator.
OverflowView(
          direction: Axis.vertical,
          spacing: 5,
          children: [
            for (int index = 0; index < _labels.length; index++)
              CircleAvatar(
                foregroundColor: Colors.white,
                backgroundColor: _colors[index],
                radius: 30,
                child: Text(_labels[index]),
              )
          ],
          builder: (context, remaining) {
            return CircleAvatar(
              foregroundColor: Colors.white,
              backgroundColor: Colors.red,
              radius: 30,
              child: Text("+$remaining"),
            );
          },
        )
Here we have used OverflowView widget from overflow_view package. This widget has below 4 properties,
direction: This property can be use to show child widgets in horizontal or vertical direction. Default direction is horizontal. The possible values to set directions are Axis.horizontal & Axis.vertical.
spacing: Used is to set space between the children. Default spacing is 0.
children: It is mandatory property. It accepts list of widgets to be displayed. In the above example, we have added list of CircleAvatar widgets. Since the vertical direction is set, these widgets are displayed in horizontal direction.
builder: It is mandatory property. It is used to create an overflow indicator. The overflow indicator will be displayed only if there is not enough space for the children. It is a function which has 2 parameters. First parameter is BuildContext & other is for no. of widgets not being displayed/rendered due to the insufficient space. By using this second parameter, we can display a widget showing the number of elements not rendered. These 2 parameters can be used to show appropriate details on the overflow indicator. In the above example, no. of non-rendered widget/children count is displayed on overflow indicator using CircularAvatar widget.
Once the changes are done as mentioned above, please check the application. It should be working just like as shown in above and below images.
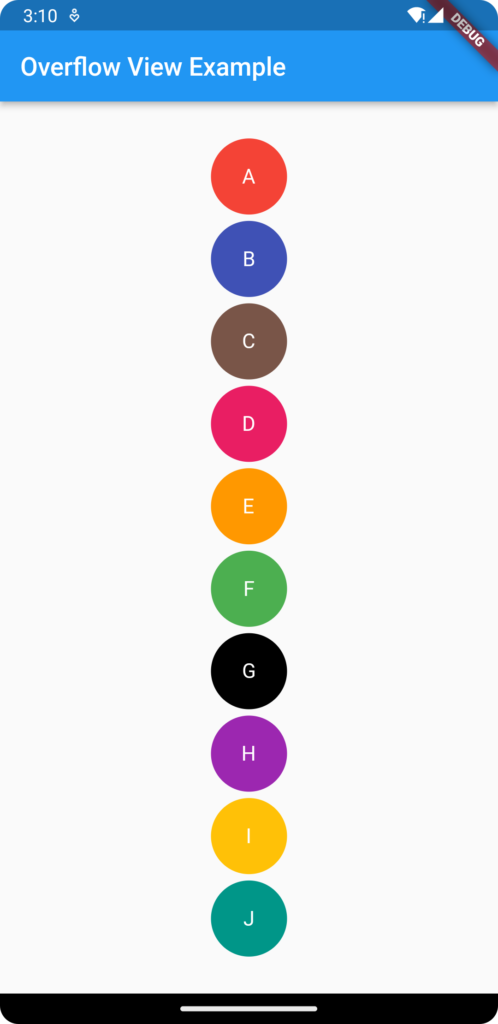
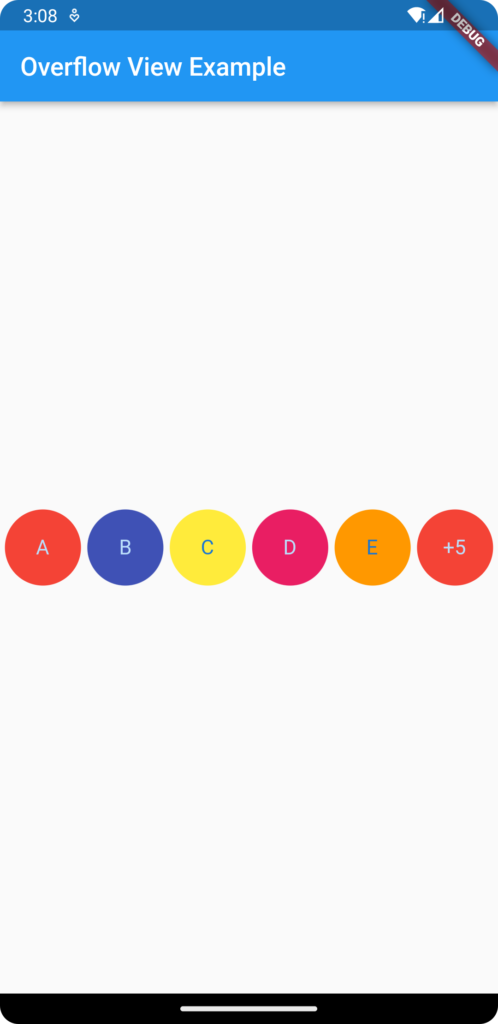
(These images from mobile app)
Conclusion
In this blog post, we have seen how displays widgets in a line with an overflow indicator at the end if there is not enough space. In order to achieve this, we have used overflow_view package which is very easy & simple to integrate in the flutter application. We have looked at the necessary configuration. We have seen important properties of OverflowView widget to customize the overflow indicator further.
The complete source code is available here.
Leave a Reply